May 16, 2016
11 minutes to readFree website using jekyll and free github hosting
In this lesson, we will learn how to get started with building a website with Jekyll, which is just a gem of Ruby. In other words, Jekyll is a simple static-site generator built in Ruby. It is a tool which lets you have all the cool features of a full-blown CMS without having to worry about managing a database.The benefit of using Jekyll is that hosting is extremely easy and scalable. You will be just managing bunch of files (in our case, we will be using github gh-pages).
System Requirements
What will we be building
We will be building a clone of this site.
What we won’t be doing
We will not be styling the site.
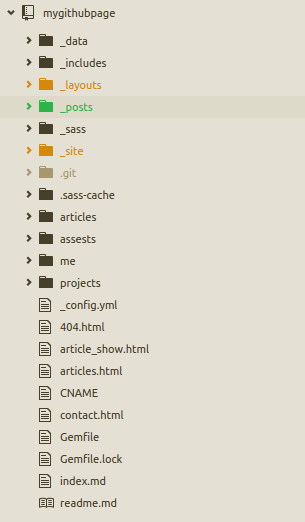
Structure of site
Before we dive into coding, I recommend you to checkout the awesome Jekyll documentation.
If you went through Jekyll documentation you will notice that to create a new project jekyll provides us a command
jekyll new ProjectName
However, we will not be using this automatic project generation command. We will be setting up all of our files and folders ourself.
Lets get started
First thing first, lets create a project destination, mygithubpage, and inside it create a configuration file.
$ mkdir mygithubpage
$ cd mygithubpage
$ touch _config.yml
Add following lines in the _config.yml .
#my variables
name: Jekyll website
description: Free website using jekyll and free github hosting

#css settings
sass:
  style: :compressed
  sass_dir: _sass
Here name is the name of your website and description is the description of your website. You can go to sass-lang.com if you want to learn more about sass.
Create a Gemfile
$ touch Gemfile
and include the jekyll gem in it, which tells to include the jekyll gem and jekyll-sitemap gem. jekyll-sitemap gem is optional which is used for creating the sitemap of our site which will be used by search engines.
source 'https://rubygems.org'
gem 'jekyll'
gem 'jekyll-sitemap'
Open terminal and run bundle install in the main directory. It will install all the specified gems in Gemfile and creates a new file Gemfile.lock.
Lets create a directory _data in which we will store the data files needed for our site.
$ mkdir _data
$ cd _data
$ touch navigation.yml
For now we will just add our navigation links. We are setting the link name and url.
- title: home
  url: /

- title: about
  url: /me

- title: articles
  url: /articles

- title: projects
  url: /projects
Now create a folder _includes in which we will store our header and footer. So, create two html files named header.html and footer.html
<header>
  <a href="#">MyGithubPage</a>
  <nav>
    {% for item in site.data.navigation  %}
      <a href="{{ item.url }}">{{ item.title }}</a>
    {% endfor %}

  </nav>
</header>
As mentioned before, I will not be focusing much on styling in this tutorial. However I will make all the source code available in github.
Basically what we are doing here is that we are looping through each of our navigation links that we stored in our navigation.yml and displaying them as links. I believe you can make your own footer page. If you want to follow along the tutorial put the following code in footer.html
<footer id="main_footer">
<p> Proudly powered by <a href="https://www.jekyllrb.com/">Jekyll</a> and <a href="https://www.github.com">Github</a> © 2016 Your Name</p>
<nav>
<a href="https://www.facebook.com/#"><i class="fa fa-facebook"></i></a>
<a href="https://twitter.com/#"><i class="fa fa-twitter"></i></a>
<a href="https://github.com/#"><i class="fa fa-github"></i></a>
</nav>
</footer>
Let’s move on to creating layouts for our page and posts. Create a _layouts folder and make a new html file called default.html . This will be the main layout that our pages and posts will use.
<!DOCTYPE html>
<html>
  <head>
    <meta charset="utf-8">

    {% if page.title %}
      <title>{{ page.title }}</title>
    {% else %}
      <title>{{ site.name }}</title>
    {% endif %}

    <meta name="description" content="{{ site.description }}">

    <link rel="stylesheet" type="text/css" href="/assests/css/applications.css">
  </head>
  <body>
    {% include header.html %}

      {{ content }}

    {% include footer.html %}
  </body>
</html>
In the head section, by using if page.title we are checking if the page has title or not. If the title exists then display the title. If it doesn’t exist we display the name of site which we defined in our _config.yml file. include header.html and include footer.html will be replaced by the content of our header.html and footer.html respectively. {{ content }} will be replaced by the content of other pages that we will create.
So, this default.html is the main layout for our site.
We will now create layout for our posts. Create a file post.html in _layouts directory. Include the code:
---
layout: default
---

	<div id="post_show_content" class="skinny_wrapper wrapper_padding">
		<header>
			<p class="date">{{ page.date | date: '%B %-d, %Y' }}</p>
			<h1>{{ page.title }}</h1>
			<hr>
		</header>

		<div id="content">
			{{ content }}
		</div>
		<hr>


		<p>
		<i>You might also like...</i> <br>

		{% for post in site.posts %}
			{% if page.title != post.title %}
				<a href="{{ post.url }}">{{ post.title }}</a><br>
			{% endif %}
		{% endfor%}
  	</p>
	</div>
layout: default tells jekyll to use default page as our layout for the post. This is known as the frontmatter. Let’s make another layout page for our about section. Create about.html in _layouts directory and include the following code:
---
layout: default
---
<div id="post_show_content" class="skinny_wrapper wrapper_padding">
  {{ content }}
</div>
We are using default layout for about section as well. Only our style will be different in about section. Now create a new directory _posts inside our project. _posts will contain all of our post in the website. The naming convention for the blog post in jekyll should be strictly followed. Name of the blog post should start with YYYY-MM-DD- followed by the name of the post. e.g.: 2016-05-01-Name-of-the-post.md. File extension can be .md or .html . Before writing the post contents, frontmatter should be included.
---
layout: post
title: Name of the post
date: 2016-05-01
categories: tutorial
---
This tells to use post layout as our layout for this post, set title of post as ‘Name of the post’, set creation date to ‘2016-05-01’, include this post in the category ‘tutorial’. The post will then be rendered by post layout and the post layout will again be rendered by our default layout.
I’ve created _sass directory to include our stylesheets which will be in .scss extension. To learn about Sass-lang, head over to sass-lang.com. You can find stylesheets in Github if you’d like to use the styles that I’ve used in this blog.
Create a articles directory and create a file index.md inside articles. In the index.md, include the following code
---
layout: about
---


{% for post in site.posts %}
  * {{ post.date | date: '%Y %b %d'}} >> [{{ post.title }}]({{ post.url }})
{% endfor %}
This will list out all the post that we have in our _posts directory.
assests directory will be used to include all of the extra files that we will be using in our blog. Let’s create two diretories css and img which we will use to include our css and images respectively.
Our site is almost ready. Create 404.html in the main directory and include the following:
---
layout: post
title: Page Does Not Exist...
permalink: /404.html
---
<p><a class="post__back" href="/"><-- back</a></p>
<br>
<p>Sorry this page does not exist...</p>
Finally create a file index.md or index.html in our project directory. This will be the homepage of our site. You can customize it in your desired way. For now I’ll just include a simple text and use the about layout for the homepage.
---
layout: about
---

Hi, my name is Aadesh Shrestha. I am 21 years old. I like coding. My favorite things are laptop, internet, headphones and an empty room.

# What do you do?
I write code and push it up on github.

# What programming languages do you use?
I like Ruby. I'm currently learning Ruby on Rails.
The site is now successfully completed. Congratulation on making the site from scratch. Feel free to shoot question if you have any at [email protected]. We will continue about github hosting in another blog post.
You might also like...
Fix garble in CSV when generating with ruby
Fixing zstd library not found issue when installing mysql gem on mac
Using specific node version in rails app.
Fix error in ruby. ruby is loading crypto in an unsafe way
Renaming tmux window
Ways of Managerial Communication
Types of Organizational Communication
Purpose of Business Communication
Need for communication
Importance of Communication
Definition of Communication
Characteristics and Benefits of Effective Communication
7 Cs of Effective Communication
Fixing mysql2 install error
Debugging Matplotlib
Ubuntu system program problem detected[Solved]
Serving Content through Cloudflare network
One liner server command in ruby
How to install Jekyll ?
How to register for GithubEducation Pack ?
How to install Ruby on Linux